
CALORIES (PER SERVING)
250 kcal
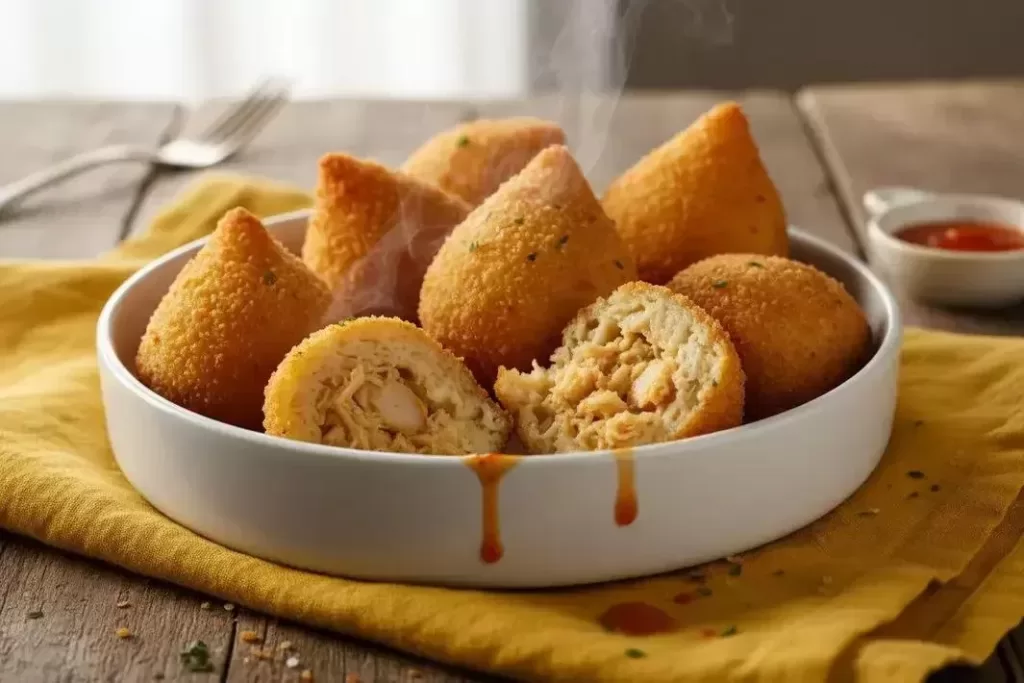
Chicken coxinha is that snack that brings back memories of family parties and gatherings of friends in grandma’s kitchen. With a juicy filling and crispy dough, this chicken coxinha is a guaranteed hit for any occasion. In this tested recipe, learn how to make the traditional version with potato in the dough to make it very soft, using chicken breast cooked in seasoning and double-breaded dough. Yields 80 units in 115 minutes of medium preparation.
Ingredients for Chicken Coxinha
- 6 cups (tea) of water (1,440 ml) – Base for cooking the chicken and potatoes, ensuring flavor in the broth for the dough.
Tip: Use filtered water for better purity. - 2 envelopes of chicken seasoning (about 20 g) – Intensely flavors the cooking of the filling and base ingredients. Substitution: Chicken bouillon cubes dissolved.
- 1 kg of chicken breast – Main protein of the filling, juicy and easy to shred.
Tip: Choose fresh for better yield. - 3 medium potatoes (about 500 g) – Essential for the light and soft dough of the coxinha. Substitution: Sweet potato for a sweeter version.
- 2 tablespoons of oil (30 ml) – To sauté onion and enhance the flavors of the filling.
- 1 grated onion (about 150 g) – Aromatic base of the filling, adds natural sweetness.
- 2 seedless tomatoes, in small cubes (about 200 g) – Moisture and balanced acidity in the salty filling.
- 3 tablespoons of chopped green olives (45 g) – Salty touch and crunchy texture in the filling.
- Half a cup (tea) of chopped parsley (30 g) – Freshness and vibrant color to the end of the filling.
Substitution: Cilantro for aromatic variation. - 100 g of butter – Enrichment of the dough, making it soft and flavorful. Substitution: Unsalted margarine.
- 5 cups (tea) of wheat flour (700 g) – Structural base of the elastic and enveloping dough.
- 4 beaten eggs (about 200 g) – For breading, sealing the external crunchiness.
Tip: Beat well for uniform coating. - Breadcrumbs for breading (about 300 g) – Final crunchy touch of the coxinhas after double breading.
Utensils for Making Chicken Coxinha
Gathering all the necessary utensils before starting the preparation of chicken coxinha makes the process easier, avoids unnecessary pauses, and keeps the kitchen flow organized for a perfect result in 115 minutes.
- Large pot
- Medium pot
- Cheese or vegetable grater
- Potato masher or strainer
- Wooden spoons or spatula
- Bowls or shallow plates
- Deep skillet or frying pot
- Paper towel or drainer
- Clean cutting boards
How to Make Chicken Coxinha
Dough and Filling
- Cook chicken and potatoes: In a wide pot, combine 6 cups of water, the 2 envelopes of chicken seasoning, 1 kg of chicken breast, and 3 washed medium potatoes. Bring to medium-high heat, stirring to completely dissolve the seasoning. Cook for about 30-40 minutes until the chicken and potatoes are tender (test by piercing with a fork). This step flavors the essential broth for the dough.
- Prepare the cooked ingredients: Remove from heat and reserve all the broth. While still hot, mash the potatoes with a masher or fork to form a smooth puree, avoiding lumps in the subsequent dough. Shred the chicken into fine strands, discarding bones or skin if any.
- Sauté the filling base: Heat 2 tablespoons of oil in another pot over medium heat. Add 1 grated onion and sauté for 2-3 minutes until translucent and lightly golden, releasing natural sweetness.
- Incorporate filling: Add the shredded chicken, 2 seedless tomatoes in small cubes, and 3 tablespoons of chopped green olives. Mix well for 4-5 minutes over medium heat to integrate flavors.
- Finish the filling: Add the remaining chicken seasoning envelope, half a cup of hot water, and sauté stirring until the liquid completely evaporates (about 5 minutes). Sprinkle half a cup of fresh chopped parsley, incorporate, and remove from heat to cool. The filling should be moist but not watery.
- Start the dough: In the large pot, pour the reserved broth (approximately 5 cups), the potato puree, and 100 g of butter. Bring to high heat until boiling, stirring occasionally to uniform.
- Add flour: Pour the 5 cups of wheat flour all at once. Stir vigorously with a wooden spoon to incorporate without forming lumps, forming elastic dough in 2-3 minutes.
- Cook the dough: Continue cooking for another 5 minutes over medium heat, stirring constantly. The dough is ready when it completely unsticks from the bottom of the pan and forms a smooth ball.
- Rest the dough: Transfer to a clean surface lightly greased. Knead gently for 5 minutes until cool and pliable, facilitating later shaping.
Assembly and Finishing
- Divide the dough: Pull portions the size of a tablespoon and open in the damp palm of your hand, forming a thin 8-10 cm disk to avoid cracks.
- Fill and shape: Place 1 tablespoon of cold filling in the center. Close by shaping into the classic coxinha format (chicken leg), sealing the edges well so the filling doesn’t leak during frying. Repeat until ingredients are finished, yielding 80 units.
- Double bread: Pass each coxinha through breadcrumbs, dip in the 4 beaten eggs, and repeat through breadcrumbs for extra crunchy crust. Press lightly to adhere.
- Fry carefully: Heat plenty of oil to 170-180°C in a deep skillet. Fry in small batches for 4-5 minutes until evenly golden on the outside, keeping the inside warm (test one to check). Drain on paper towels to absorb excess oil. Serve hot.
Nutritional Information for Chicken Coxinha
The values below are approximate estimates per serving (1 chicken coxinha unit), calculated based on official food composition tables (such as TACO/TBCA/USDA) and may vary depending on the ingredients used and preparation method.
| Nutrient | Amount per serving | % DV* |
|---|---|---|
| Calories | 250 kcal | 13% |
| Carbohydrates | 25 g | 8% |
| Proteins | 10 g | 20% |
| Total fats | 12 g | 18% |
Macronutrient distribution per serving
*% Daily Values based on a 2000 kcal diet. Values calculated proportionally to the ingredients of the chicken coxinha recipe, using TBCA for potato, chicken, and flour, and USDA for butter and frying oil. Source: TBCA | USDA.
Tips for Perfect Chicken Coxinha

These special tips are essential to ensure your chicken coxinha comes out perfect, with soft dough inside, crunchy outside, and juicy filling without leaking. Apply them to avoid common mistakes and obtain 80 impeccable units in 115 minutes of medium preparation.
- Measure the broth precisely: The cooking liquid should yield exactly 5 cups for ideal dough. Top up with water if necessary – too little broth makes the dough dry; excess makes it soft.
- Mash hot potatoes: Avoid lumps by making puree immediately after cooking. Cold potatoes harden and harm the dough’s elasticity.
- Cool filling completely: Hot filling moistens the dough during shaping, causing breaks during frying. Leave in the refrigerator for 30 minutes.
- Perfect dough consistency: Cook until it unsticks from the bottom of the pan. Raw dough absorbs oil; overcooked hardens. Test: it should stretch without tearing.
- Shape with damp hands: Moisten palms so the dough doesn’t stick, forming the classic thigh shape without trapped air that expels filling.
- Double breading mandatory: Breadcrumbs + egg + breadcrumbs again ensures a golden and crunchy crust. Press lightly to adhere.
Variations of Chicken Coxinha
The base recipe for chicken coxinha is versatile, allowing creative adaptations in the filling or dough while maintaining the traditional method to yield 80 crunchy units in 115 minutes. Try these tested variations for special occasions or dietary restrictions, always cooling the filling and achieving the perfect dough consistency.
- Creamy cheese coxinha: Replace chicken with 800g of creamy cheese spread mixed with shredded mozzarella and green onions. Use cheese seasoning in cooking and add catupiry to the breading for a gourmet party version.
- Vegan with vegetables: Swap chicken for cooked hearts of palm or peas (1 kg), sauté with chopped vegetables and vegetable seasoning. In the dough, replace butter with coconut oil. Fry or bake in airfryer at 200°C for 15 minutes for low-carb.
- Healthy airfryer baked: After breading, brush with oil and bake in airfryer at 180°C for 12-15 minutes, turning halfway. Reduces 50% of calories (about 125 kcal/unit), maintaining crunchiness without excess oil.
- Seafood shrimp: Use 1 kg of medium cleaned shrimp instead of chicken, cooking in the same broth with seafood seasoning. Add milk cream to the sauté for tropical creaminess.
- Spicy with calabresa: Mix 500g shredded chicken with ground calabresa and calabresa pepper in the sauté. For kids, reduce pepper and add corn.
- Chicken with Sicilian lemon: Add zest and juice of 2 lemons to the filling for citrus freshness. In the dough, a touch of fresh herbs. Ideal for quick snacks.
Ingredient Tips for Chicken Coxinha
Choosing fresh and quality ingredients is key to perfect chicken coxinha, balancing flavor, texture, and nutrition in each of the 80 servings. Prioritize lean chicken breast for light proteins (about 250 kcal/unit), firm potatoes for elastic dough, and natural seasonings avoiding excess sodium. Substitutions like trans-fat-free vegetable oil for butter reduce saturated fats while maintaining softness.
The potato in the puree adds natural starch, improving moisture retention in the dough – opt for asterix or baraka varieties. The sauté with tomato and olives brings antioxidant lycopene and omega-9, while fresh parsley boosts vitamin K without extra calories.
- Fresh chicken breast: Lean protein source (20g/100g), rich in niacin for metabolism. Avoid frozen for too long for juicy shredded texture.
- Firm medium potatoes: Provide potassium (400mg/medium unit) and fiber; mash hot for smooth puree that prevents cracked dough.
- Parsley and grated onion: Antioxidants and prebiotics for digestion; cilantro replaces parsley in Northeastern regional versions.
- Butter or coconut oil: Moderate fat for creaminess; light version use Greek yogurt in the filling reducing 30% calories.
- Homemade broth: Controlled sodium vs industrial; top up with filtered water if exact volume is lacking.
Storage and Preservation
Fried, store chicken coxinha in an airtight container in the refrigerator for up to 3 days (max. 4°C). Reheat in airfryer at 180°C/5min to restore crunchiness. Freeze raw breaded for 3 months (-18°C), package individually to avoid freezer burn; fry directly frozen in 170°C oil adding 2min. Never thaw chicken at room temperature to prevent bacteria – use refrigerator overnight.
Did you like this recipe?
If you liked it, share it with your friends and family!
Your chicken coxinha is ready to shine on the table! Serve hot on a rustic platter with lemon on the side to enhance the juicy filling, accompanied by homemade pepper sauce or ketchup. Perfect for family parties, afternoon snacks, or buffets, yields 80 crunchy units that disappear quickly.
This classic recipe is now part of your culinary repertoire – repeat whenever you want to impress with light potato dough and authentic homemade flavor. In 115 minutes, you transform simple ingredients into an unforgettable snack for any special occasion.
To vary the snack menu, try our Easy Snack Recipes Practical and Delicious . They are quick options that perfectly complement the crunchiness of the coxinhas in parties or casual snacks.
If you want another crunchy salty, the Crunchy and Easy Meat Esfiha to Make pairs well, bringing intense seasoning flavors that match the shredded chicken filling.
For a lighter snack on the side, try the Creamy Crunchy and Soft Inside Cheese Bread . Its fluffy texture contrasts with the external crust of the coxinhas, ideal for a hearty afternoon coffee.
FAQ – Frequently Asked Questions about Chicken Coxinha
Can I substitute the butter?
Yes, replace the butter with vegetable oil or unsalted margarine in the same amount of 100 g to maintain the softness of the dough. Coconut oil gives a tropical flavor. Test in small quantities to adjust texture, as it may slightly alter the external crunchiness.
How do I know the right dough consistency?
The dough is ready when it completely unsticks from the bottom of the pan after cooking for a few more minutes while stirring. It forms a smooth and elastic ball when kneading until cool. If it remains sticky, cook for another 2 minutes; if dry, add broth gradually.
Can I freeze the coxinhas? How to do it?
Yes, freeze the breaded but unfried coxinhas for up to 3 months in labeled proper packaging. Fry directly from the freezer in hot oil. Thaw in the refrigerator if preferred, but immediate frying preserves crunchiness. Consume fried ones within 3 days in the refrigerator.
The filling leaked during frying. What did I do wrong?
Hot filling or poorly sealed dough causes leakage. Always cool the filling in the refrigerator for 30 minutes beforehand. Mold by sealing the edges well with damp hands and use double breading to seal. Avoid overfilling to maintain integrity.

- Juicy Bauru Sandwich with Homemade Roast Beef - 17 de March de 2026
- Refreshing Flavored Water with Fruits and Herbs - 17 de March de 2026
- Creamy and Easy Classic Can Mousse - 11 de March de 2026