
60 minutes
40 servings
Easy
KCALORIES (PER SERVING)
150 kcal
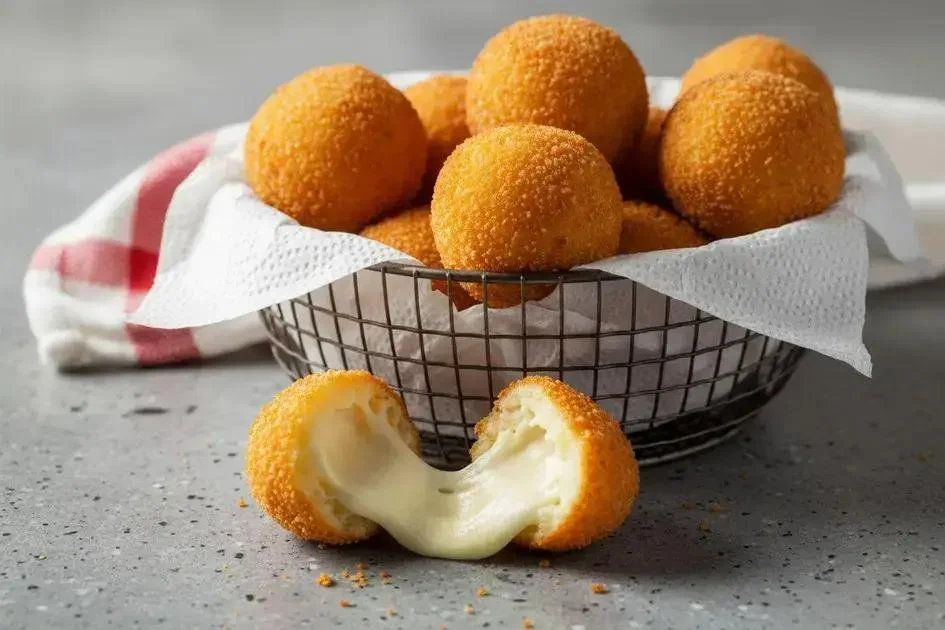
Prepare irresistible cheese balls, crispy on the outside and with a creamy mozzarella filling that melts in your mouth. This tested recipe is super simple, perfect for parties or quick snacks, yielding 40 units in just 60 minutes. Ideal for those seeking easy and tasty appetizers!
Cheese Balls – Today we’re making cheese balls crispy on the outside with a creamy mozzarella filling that melts in the mouth, easy in 60 minutes for 40 servings. Irresistible snack for parties and snacks. Perfect for family happy hour. Shall we fry now?
Ingredients for Cheese Balls
- 1 ½ cups whole milk (360 ml) – Essential liquid base to hydrate the dough and create creaminess.
Substitution: Skim milk for lighter version. - 1 vegetable bouillon cube – Adds umami flavor and enhances the dough’s seasoning.
Substitution: Homemade vegetable broth dissolved. - 4 tablespoons butter (60 g) – Enriches the dough with fat for golden browning and soft inside.
- 1 cup all-purpose flour (120 g) – Forms the elastic and malleable dough structure for shaping.
- 3 tablespoons chopped parsley (12 g) – Brings freshness and herbaceous aroma to the cooked dough.
- ½ cup breadcrumbs (60 g) – Creates the crunchy golden crust after frying.
Substitution: Panko for extra crunch. - 100 g mozzarella cheese – Filling that melts and creates the irresistible creamy center. Cut into small cubes.
- 2 beaten eggs – For breading and securing the breadcrumbs to the surface.
Utensils for Making Cheese Balls
Organizing utensils in advance makes preparing the cheese balls easier, avoiding interruptions and ensuring efficiency in the dough cooking, shaping, and frying steps.
- Medium pot
- Wooden spoon or spatula
- Shallow bowls (3 units)
- Sharp knife
- Deep pot or deep skillet
- Skimmer or tongs
- Paper towel or drainer
How to Make Cheese Balls
- Heat the milk with the bouillon: Place the whole milk in a medium pot over medium heat and fully dissolve the vegetable bouillon cube, stirring until it lightly boils. Remove from heat and set aside. This step flavors the liquid base, avoiding bland taste in the final dough.
- Prepare the roux base: In the same cleaned pot or another, melt the butter over low heat for 1-2 minutes. Add the flour gradually, stirring vigorously with a wooden spoon for about 2 minutes until lightly golden and forming a smooth paste – this is the roux, which thickens the dough without lumps.
- Incorporate the milk gradually: Pour the reserved milk in a thin stream while stirring quickly and continuously for 3-4 minutes. The constant motion hydrates the flour evenly, creating a creamy dough without unwanted lumps – sign: thick porridge consistency.
- Cook until it releases: Keep over medium-low heat, stirring for 5-7 minutes until the dough pulls away from the bottom and sides of the pot, forming a smooth ball. Turn off and test: it should be pliable when cool to the touch, without sticking to hands.
- Add parsley and cool: Incorporate the fresh chopped parsley into the hot dough, mixing well to distribute the aroma. Transfer to a greased bowl and cover with plastic wrap in direct contact, letting it cool for 20-30 minutes at room temperature – this prevents dry skin and eases shaping.
- Fill the dough: Grease hands with butter and take small portions (about 20g each), flattening in the palm. Place a mozzarella cube (2-3g) in the center, close completely without leaks – repeat for 40 units.
- Double breading: Roll each ball first in breadcrumbs (thin layer), dip in beaten eggs (drain excess), and repeat in breadcrumbs for a thick crunchy crust. Press gently to adhere well – avoid overhandling to prevent opening.
- Ideal frying: Heat plenty of oil (about 1 liter, 5cm depth) to 170-180°C in a deep pot (test: bread crumb fries in 30s). Fry 4-6 balls at a time for 2-3 minutes, turning once, until evenly golden. Don’t overcrowd to maintain temperature.
- Drain and finish: Remove with skimmer to stacked paper towels, pressing lightly to absorb oil. Let rest 2 minutes for maximum crunch and serve hot, ensuring melted cheese inside.
Nutritional Information for Cheese Balls
The values below are approximate estimates per serving (1 ball approx. 25g), calculated based on official food composition tables (like TBCA/TACO and USDA FoodData Central) and may vary by ingredients and preparation method.
| Nutrient | Amount per serving |
|---|---|
| Energy Value | 150 kcal |
| Total Carbohydrates | 12 g |
| Proteins | 5 g |
| Total Fats | 9 g |
| Saturated Fats | 4 g |
| Dietary Fiber | 0.5 g |
| Sodium | 180 mg |
Macronutrient Distribution per Serving
Data source: Values calculated based on recipe quantities, using Brazilian Food Composition Table (TBCA) for milk, flour, cheese, and butter, and USDA FoodData Central for eggs and breadcrumbs.
TBCA | USDA. *% Daily Values based on 2000 kcal diet.
Tips for Perfect Cheese Balls

These special tips reveal professional tricks to ensure perfect cheese balls: crispy outside, creamy filling that melts in the mouth, and impeccable texture, avoiding common mistakes like soft dough or greasy frying.
- Dough at exact point: Test dough after cooking: it must fully release from the pot and form a smooth ball. If still sticky, cook 1-2 more minutes – ensures easy shaping without cracks during frying.
- Avoid lumps in dough: Always add milk in thin stream while stirring vigorously; common error is dumping at once, creating lumps. Use whisk for homogeneous texture like savory brigadeiro.
- Essential cooling: Let dough cool 30 minutes before filling – hot dough melts cheese prematurely, causing leaks during frying. Cover with plastic to prevent drying.
- Uniform filling: Cut mozzarella into 1cm cubes; large pieces explode during frying. Center well when closing for perfect melt without leaks, achieving ideal crunchy-creamy contrast.
- Oil at right temperature: 170-180°C (test with dough bit: rises bubbling in 20s). Cold oil absorbs excess fat; too hot burns outside before inside cooks.
- Reinforced double breading: Press breadcrumbs in second layer for thick crunchy shell; skip and it gets soggy. Lightly grease hands for smooth balls without sticking.
- Don’t overcrowd frying: 5-6 balls at a time keeps oil hot; too many lowers temp, leaving insides raw and outsides soggy. Drain well on double paper towels.
- Fresh parsley makes a difference: Chop right before use for vibrant aroma; dried loses potency. Add at end while hot to preserve essential oils, elevating simple flavor to gourmet.
Cheese Ball Variations
The versatile creamy dough base of cheese balls allows countless creative adaptations, keeping the crunchy exterior and melted filling. Try these variations to surprise at parties or snacks, always using double breading for perfect texture.
- Baked Cheese Balls: Replace frying with baking at 200°C for 20 minutes, turning halfway; brush with oil to golden. Reduces ~40% calories, ideal for healthy version yielding same 40 units.
- Smoked Cheddar Filling: Swap mozzarella for 100g cheddar cubes; more intense smoky flavor. Keep process identical for perfect melt without changing total time.
- with Crispy Bacon: Mix 50g fried chopped bacon into cooled dough; fill with mozzarella. Adds extra salty crunch, perfect for bar snacks.
- Herb Aromatic: Replace parsley with basil and oregano mix (3 tbsp); fresh and Italian. Keeps yield and suits themed events like pizza.
- Kids Version with Ham: Fill with ham and mozzarella alternated; cut into smaller sticks for fingers. Appeals to kids for afternoon snack without changing base dough.
- Spicy with Catupiry: Use 100g spicy catupiry for filling; bread same. Bold version for spice lovers, keeping traditional crunch.
Ingredient Tips for Cheese Balls
Choose fresh, quality ingredients for impressive cheese balls: creamy whole milk ensures soft dough, fresh mozzarella melts perfectly, and freshly picked parsley boosts freshness. Smart substitutions maintain balance, like panko instead of breadcrumbs for extra crunch or homemade broth avoiding processed.
Nutritionally, this recipe balances cheese and egg proteins with flour carbs, providing quick energy ideal for snacks. Protein filling sustains satiety, while herbs add vitamins without extra calories – perfect moderate appetizer portion.
- Quality mozzarella cheese: Choose fresh (not processed) for superior melt and authentic flavor; store in water to keep juicy.
- Whole milk vs. plant-based: Plant-based (almond) for low-carb, but whole gives ideal creaminess – always heat from cold to avoid curdling.
- Organic parsley: Rich in vitamins K and C, enhances flavor without extra salt; dried is 1:3 fresh.
- Unsalted butter: Controls sodium, already high from bouillon; ghee for lactose-free.
- Free-range eggs: More nutrients and flavor; beat with pinch of salt for better breading.
Storage and Preservation
Fried last 2 days in sealed fridge (recrisp in airfryer 180°C/5min). Freeze raw breaded up to 3 months: tray 5h, vacuum seal, fry from frozen without thawing for perfect crunch and food safety, avoiding excess moisture.
The crispy stuffed cheese balls are amazing served warm, with a drizzle of herb sauce or ketchup on the side, on sticks for easy snacking. Perfect to share on a rustic board, pairs well with chilled caipirinha or natural juice, elevating any casual moment.
Ideal for kids’ parties, family barbecues, or happy hour with friends, this recipe yields 40 units that disappear fast. With simple steps and tested tips, you now master the secret for flawless repeats. For a full meal, try alongside our Creamy Chicken Curry with Apples.
Now just enjoy the crunch outside and melt inside – bon appétit and happy celebrations!
Can I substitute mozzarella with another cheese?
Yes, use 100 g coalho or provolone cheese, cut into identical cubes. These cheeses melt well and keep the creamy center without altering dough structure. Avoid very soft cheeses like cream cheese, as they may leak during frying.
How do I know if the dough is ready for shaping?
The dough must fully release from the pot bottom and form a smooth ball after stirring 5-7 minutes. When slightly cooled, it’s pliable without sticking to greased hands. If still sticky, cook 1-2 more minutes over low heat to thicken.
Can I freeze the cheese balls and how long do they last?
Yes, freeze breaded balls on a tray for 5 hours until firm, then bag in plastic and label. They last up to 3 months in freezer or chest freezer. Fry directly from frozen in hot oil to preserve crunch without thawing.
Did you like this recipe?
If you liked it, share with friends and family!

- Juicy Bauru Sandwich with Homemade Roast Beef - 17 de March de 2026
- Refreshing Flavored Water with Fruits and Herbs - 17 de March de 2026
- Creamy and Easy Classic Can Mousse - 11 de March de 2026